• To arm, press and hold the top button until the red LED
flashes and the horn chirps two (2) times then release.
• You now have twenty (20) seconds to secure the POD to your
door knob. The red light will blink slowly during this time.
• After (20) twenty seconds, the red light will stop blinking to
indicate POD is armed.
•
P
ara activar, presione y mantenga presionado el botón
s
uperior hasta que el LED rojo parpadee y la bocina chirree
d
os (2) veces, luego suelte.
• Usted ahora tiene veinte (20) segundos para sujetar el POD al
pomo de su puerta. La luz roja parpadeará lentamente durante
este tiempo.
• Después de (20) veinte segundos, la luz roja dejará de parpadear
para indicar que el POD está activado.
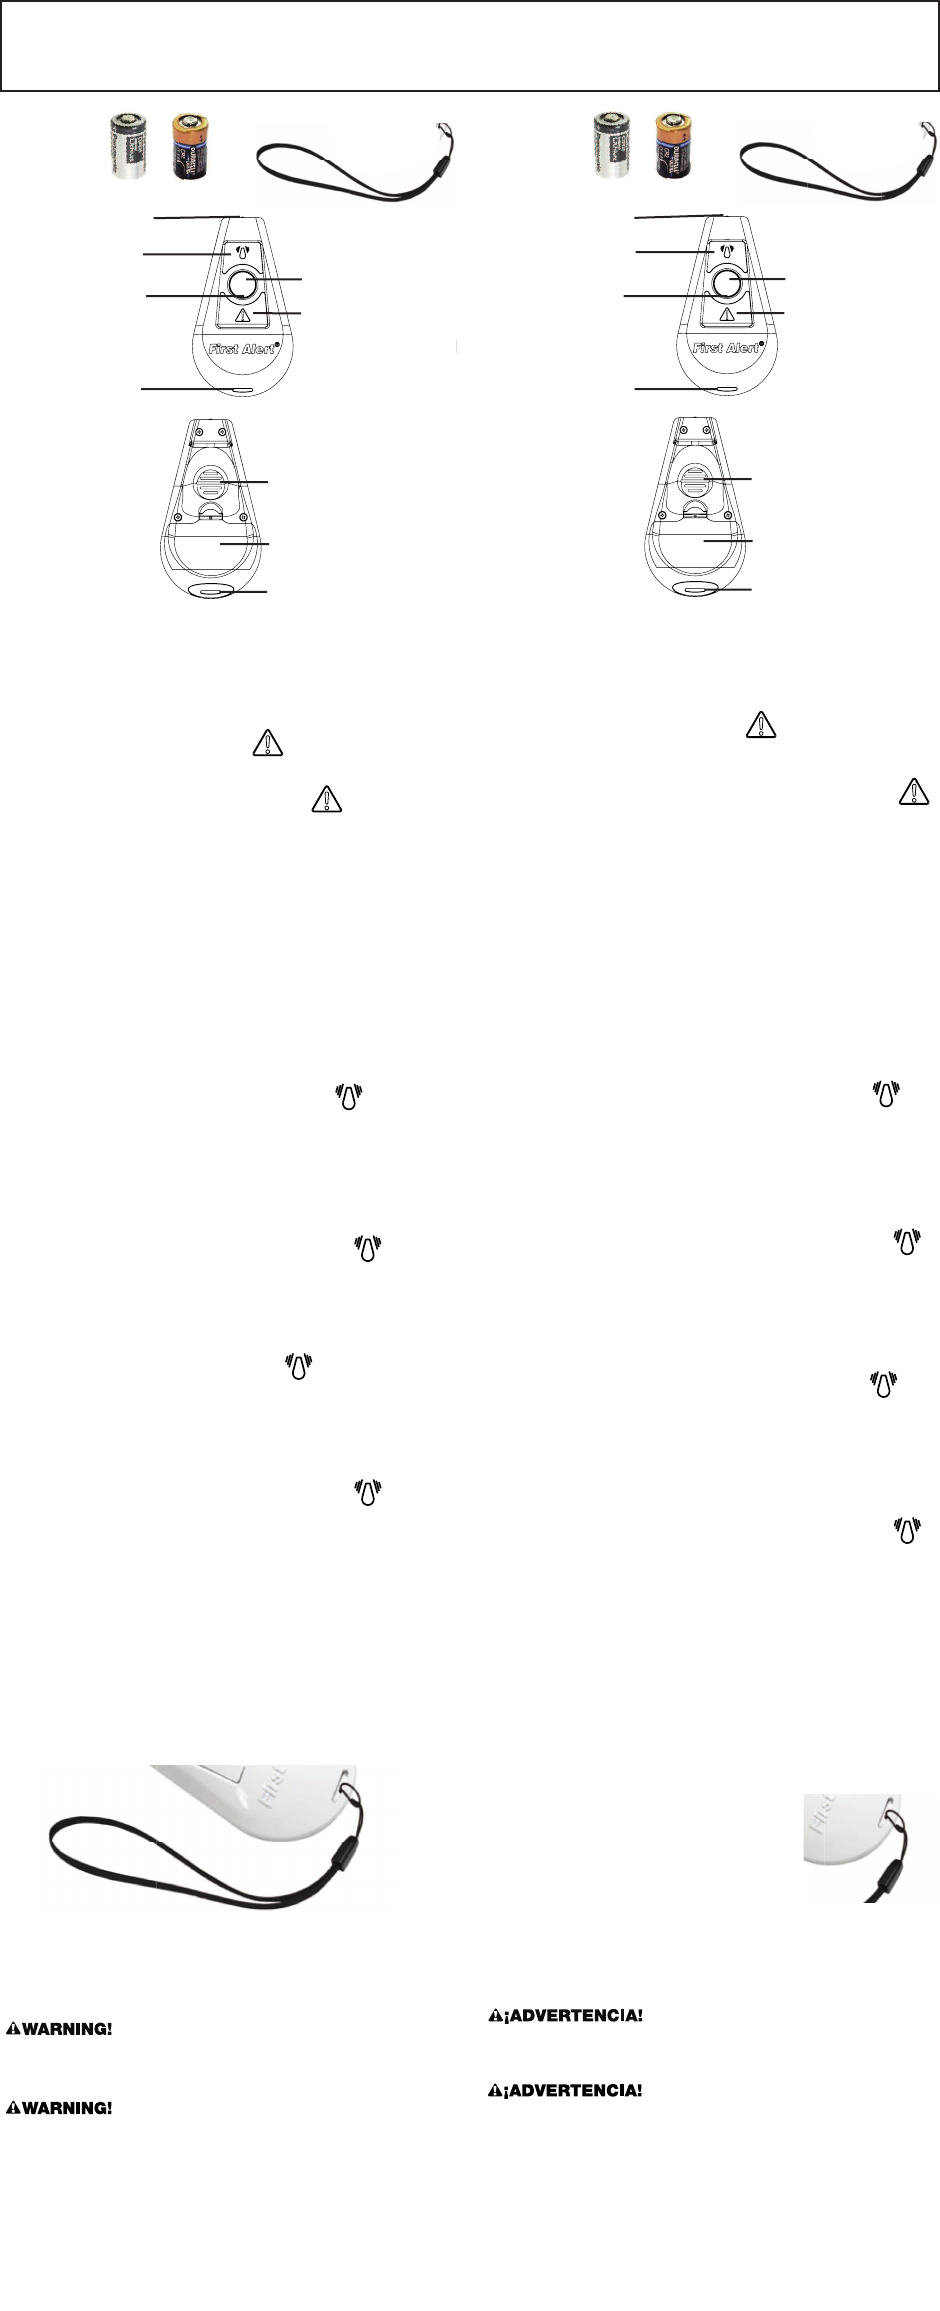
ACCESSORIES
(1) Battery
D
IAGRAM (FRONT)
(1) Strap
INSTALACIÓN DE BATERÍA
1. Quite la tapa de la batería.
2. Inserte una (1) batería CR2 en el compartimiento de batería.
3. Vuelva a colocar la tapa de la batería.
NOTA: La alarma hará bip una vez si la batería ha sido instalada
correctamente. Si usted no escucha un bip, asegúrese que la batería
esté instalada en la posición correcta (Empareje “+” a “+”).
ENCENDER LA ALARMA DE PÁNICO
• Presione el botón inferior marcado
La alarma sonará continuamente y la luz LED blanca parpadeará
rápidamente.
A
PAGAR LA ALARMA DE PÁNICO
•
Presione y mantenga presionado el botón inferior marcado
• La alarma hará bip dos (2) veces rápidamente y la luz roja
parpadeará dos (2) veces para confirmar la desactivación,
suelte el botón.
CENTER BUTTON
(WHITE LED LIGHT)
B
OTTOM BUTTON
(PANIC ALARM)
WHITE LED LIGHT
T
OP BUTTON
(VIBRATION/MOTION ALARM)
RED LED LIGHT
(
STATUS LIGHT)
STRAP EYELET
S
IREN ENCLOSURE
BATTERY COVER/
COMPARTMENT
STRAP EYELET
DIAGRAM (BACK)
CARCASA DE SIRENA
TAPA DE BATERÍA/
COMPARTIMIENTO
OJAL DE CORREA
D
IAGRAMA (ATRÁS)
or
ACCESORIOS
(
1) Batería
D
IAGRAMA (FRENTE)
(1) Correa
BOTÓN CENTRAL
(
LUZ LED BLANCA)
BOTÓN INFERIOR
(ALARMA DE PÁNICO)
LUZ LED BLANCA
BOTÓN SUPERIOR
(ALARMA DE VIBRACIONES/
M
OVIMIENTO)
L
UZ LED ROJA
(LUZ DE ESTADO)
OJAL DE CORREA
o
USER’S MANUAL
P
ersonal Security Alarm
P
OD (Protection on Demand)
M
odel: PA100
M08-0462-002 12/13
ESCOGER UNA BATERÍA DE REEMPLAZO
Su alarma POD requiere de una batería CR2 de 3V. La siguiente batería
es un reemplazo aceptable: Duracell DLCR2. Estas baterías están
disponibles en muchas tiendas minoristas locales.
• Siempre utilice las baterías exactas especificadas por este Manual de
Usuario. NO use baterías recargables. Antes de instalar las baterías
limpie los contactos de las baterías y también los del aparato. Instale
baterías correctamente en cuanto a la polaridad (+ y -).
• Mantenga las baterías fuera del alcance de los niños. En el caso de
que una batería sea ingerida, contacte inmediatamente a su centro
de toxicología, su médico, o a la línea de emergencia Nacional de
Ingestión de Baterías al 202-625-3333 ya que pueden ocurrir daños
graves.
• Por favor, desechar o reciclar adecuadamente las baterías usadas,
siguiendo todas las regulaciones locales. Consulte con su autoridad
local de manejo de desechos o con una organización de reciclaje
para encontrar un centro de reciclaje de productos electrónicos en
su área. NO DESECHE LAS BATERÍAS EN EL FUEGO.
LAS BATERÍAS PUEDEN EXPLOTAR O DERRAMARSE.
PROBAR
Es importante probar la unidad cada semana para asegurar que esté
funcionando correctamente.
L
UGARES RECOMENDADOS PARA LA ALARMA
V
IBRATORIA/MOVIMIENTO
-
CARTERA - MANECILLA DE PUERTA - MOCHILA
- VENTANA - MALETA - CLOSET
-
MALETÍN - GABINETE/GAVETAS -CARRUAJE DE BEBÉ
N
OTA: No coloque su alarma POD en el fondo de su bolso.
R
ecomendamos sujetar su alarma POD al cincho de su bolso para
e
vitar alarmas molestas.
A
LARMA DE VIBRACIONES/MOVIMIENTO
E
l botón superior tiene dos (2) posiciones: una para alarma instantánea
y otra para la retardada.
MANUAL DEL USUARIO
Alarma de Seguridad Personal
P
OD (Protección a Demanda, por sus siglas en inglés)
M
odelo: PA100
B
ATTERY INSTALLATION
1
. Remove the battery cover.
2. Insert one (1) CR2 battery in the battery compartment.
3
. Replace the battery cover.
N
OTE: Alarm will beep one time if the battery has been installed
c
orrectly. If you don’t hear a beep, make sure the battery is installed in
t
he correct position (Match “+” to “+”).
T
URN ON PANIC ALARM
•
Press the bottom button marked
A
larm will siren continuously and white LED light will blink rapidly.
TURN OFF PANIC ALARM
•
Press and hold the bottom button marked
• The alarm will rapidly beep two (2) times and red light will blink
two (2) times to confirm disarm, release button.
LUZ LED
• Presione y mantenga presionado el botón central para encender
la luz continuamente
• Suelte el botón para apagar la luz
COLOCAR LA CORREA
• Enhebre el bucle delgado a través del ojal
de correa
• Enhebre el extremo de la correa a través
del bucle delgado como se muestra.
ADVERTENCIA DE BATERÍA BAJA
Si el botón central está parpadeando en rojo y usted escucha un tictac,
es hora de reemplazar su batería.
1
T
URN ON INSTANT ALARM
N
OTE: Instant Alarm mode triggers the alarm to sound immediately.
U
se this mode when securing POD to personal belongings or door
k
nob.
• To arm, press and hold the top button marked
The alarm will rapidly beep one (1) time and red light will blink
one (1) time then release.
•
You now have twenty (20) seconds to secure the POD to your
d
oor knob or personal belongings. The red light will blink slowly
d
uring this time.
•
After twenty (20) seconds, the red light will stop blinking
i
ndicating alarm is armed.
TURN OFF INSTANT ALARM
•
To disarm, press and hold the top button marked
• The alarm will rapidly beep two (2) times and red light will blink
two (2) times to confirm disarm, release button.
T
URN ON DELAY ALARM
N
OTE: Delay Alarm mode allows you to enter or exit the door without
s
etting the alarm off immediately. Use this mode when securing POD
t
o door knob.
E
NCENDER LA ALARMA INSTANTÁNEA
NOTA: El modo de Alarma Instantánea activa la alarma para sonar
inmediatamente. Use este modo cuando sujete el POD a objetos
personales o al pomo de una puerta.
•
Para activar, presione y mantenga presionado el botón
s
uperior marcado. La alarma hará bip rápidamente una (1) vez y
l
a luz roja parpadeará una (1) vez, luego suelte.
• Usted ahora tiene veinte (20) segundos para sujetar el POD al
pomo de su puerta o a sus pertenencias personales. La luz roja
parpadeará lentamente durante este tiempo.
•
Después de veinte (20) segundos, la luz roja dejará de parpadear
i
ndicando que la alarma está activada.
APAGAR LA ALARMA INSTANTÁNEA
• Para desactivar, presione y mantenga presionado el botón
superior marcado.
•
La alarma hará bip rápidamente dos (2) veces y la luz roja
p
arpadeará dos (2) veces para confirmar la desactivación,
s
uelte el botón.
ENCENDER LA ALARMA RETARDADA
N
OTA: El modo de Alarma Retardada le permite entrar o salir por
l
a puerta sin hacer sonar la alarma inmediatamente. Use este modo
c
uando sujete el POD al pomo de una puerta.
LED LIGHT
• Press and hold center button to turn light on continuously
• Release button to turn light off
ATTACHING THE STRAP
• Thread the thin loop through the strap eyelet
• Thread the end of the strap through the thin loop as shown.
TURN OFF DELAY ALARM
• To disarm, press and hold the top button marked
• The alarm will rapidly beep two (2) times and red light will blink
two (2) times to confirm disarm, release button.
• NOTE: You will have twenty (20) seconds to disarm after an alarm
has been triggered. During this time the Red LED will flash rapidly.
TIME-OUT
In the event that the Vibration/Motion Alarm is triggered, the siren will
continuously beep for three (3) minutes or until you turn off the alarm.
After three (3) minutes, the siren will stop and reset to the original
Vibration/Motion Alarm mode (Instant or Delay).
APAGAR LA ALARMA RETARDADA
• Para desactivar, presione y mantenga presionado el botón
superior marcado.
• La alarma hará bip rápidamente dos (2) veces y la luz roja
parpadeará dos (2) veces para confirmar la desactivación, suelte
el botón.
• NOTA: Tendrá veinte (20) segundos para desactivar después de
que una alarma se ha accionado. Durante este tiempo, el LED
rojo parpadeará rápidamente.
TIEMPO DE ESPERA
En el caso de que se active la Alarma de Vibración/Movimiento, la
sirena sonará continuamente durante tres (3) minutos, o hasta que
usted desactive la alarma. Después de tres (3) minutos, la sirena se
detendrá y se restablecerá el modo de Alarma de Vibración/Movimiento
original (Instantánea o Retardada).
RECOMMENDED LOCATIONS FOR VIBRATION/MOTION ALARM
-
PURSE - DOOR KNOB - BACKPACK
-
WINDOW - SUITCASE - CLOSET
- BRIEFCASE - CABINET/DRAWERS - STROLLER
NOTE: Do not place your POD alarm at the bottom of your bag. We
recommend securing your POD alarm to the strap of your bag to avoid
nuisance alarms.
V
IBRATION/MOTION ALARM
T
he top button has two (2) settings: one for instant alarm and another
f
or delay.
LOW BATTERY WARNING
If the center button is blinking red and you hear a ticking sound, it is
time to replace your battery.
CHOOSING A REPLACEMENT BATTERY
Your POD alarm requires one 3V CR2 battery. The following battery
is acceptable as replacement: Duracell DLCR2. These batteries are
available at many local retail stores.
• Always use the exact batteries specified by this User’s Manual.
DO NOT use rechargeable batteries. Clean the battery contacts
and also those of the device prior to battery installation. Install
batteries correctly with regard to polarity (+ and -).
• Keep battery out of reach of children. In the event a battery
is swallowed, immediately contact your poison control center,
your physician, or the National Battery Ingestion hotline at
202-625-3333 as serious injury may occur.
• Please dispose of or recycle used batteries properly, following
any local regulations. Consult your local waste management
authority or recycling organization to find an electronics
recycling facility in your area. DO NOT DISPOSE OF BATTERIES
IN FIRE. BATTERIES MAY EXPLODE OR LEAK.
TESTING
It is important to test this unit every week to make sure it is working
properly.
 Manymanuals.com
 Manymanuals.de
 Manymanuals.fr
 Manymanuals.it
 Manymanuals.pl
 Manymanuals.cz
 Manymanuals.es
 Manymanuals-pt.com
Comments to this Manuals